Night sky photography is an art form that captures the beauty and mystery of the night sky. It requires careful planning, preparation, and execution to capture stunning images of the stars, the moon, and other celestial bodies. In this comprehensive guide, we will explore the techniques and equipment needed to master night sky photography. From choosing the right camera settings to finding the perfect location, we will cover everything you need to know to create breathtaking images of the night sky. So, get ready to explore the world of night sky photography and unleash your inner astronomer!
Understanding the Basics of Night Sky Photography
What is Night Sky Photography?
Night sky photography is a specialized form of astrophotography that captures the beauty and mystery of the night sky. It involves photographing the stars, planets, moon, and other celestial bodies against a dark background, often using long exposures and specialized equipment. The goal of night sky photography is to capture the majesty and wonder of the night sky in a way that is both visually stunning and scientifically accurate.
There are many different techniques and approaches to night sky photography, ranging from simple point-and-shoot camera methods to complex astrophotography setups that require specialized knowledge and equipment. Some photographers focus on capturing the beauty of the night sky in a more artistic sense, while others strive for scientific accuracy and precision.
Regardless of the approach, night sky photography requires careful planning, preparation, and execution. It involves understanding the principles of astrophotography, including exposure, focus, and composition, as well as the use of specialized equipment such as telescopes, cameras, and lenses. It also requires a deep understanding of the night sky itself, including the movement of celestial bodies, the behavior of light, and the effects of atmospheric conditions on the quality of the photographs.
In short, night sky photography is a challenging and rewarding pursuit that requires both technical expertise and artistic vision. Whether you are a seasoned astrophotographer or a beginner just starting out, mastering the basics of night sky photography is an essential step towards capturing the beauty and mystery of the night sky.
When and Where to Shoot Night Sky Photography
When it comes to capturing stunning night sky photographs, timing and location are crucial factors to consider. In this section, we will discuss the optimal times and places for night sky photography.
Optimal Times for Night Sky Photography
- New Moon: The new moon phase is the best time for night sky photography as there is no direct moonlight to compete with the stars. The moon will rise after the sunset, allowing you to capture a clear view of the stars.
- Moonrise: The ideal time for moonrise photography is during the first quarter or full moon phase. This is when the moon appears largest and most illuminated, providing a dramatic contrast against the night sky.
- Twilight: The golden hour, just after sunset or before sunrise, offers a soft, warm light that can enhance the colors of the night sky and surrounding landscape. This is a great time to capture star trails or long exposure shots.
Optimal Places for Night Sky Photography
- Remote Locations: Ideally, you want to find a location with minimal light pollution, such as remote wilderness areas, high mountains, or the desert. Check satellite images of the area to find the least light-polluted spots.
- High Elevation: Mountains and hilltops provide a higher vantage point, allowing you to escape the effects of light pollution from below. Opt for locations with an elevation of at least 5,000 feet to ensure a clearer view of the night sky.
- Natural Features: Incorporate natural features like mountains, trees, or bodies of water into your composition to create a sense of scale and depth. These elements can also help frame the night sky and guide the viewer’s eye.
- Clear Weather: Choose a location with a clear weather forecast, ensuring that the sky will be free of clouds and smoke. This will allow you to capture sharp, detailed images of the stars and other celestial objects.
By considering these factors, you can enhance your chances of capturing stunning night sky photographs that truly showcase the beauty and wonder of the cosmos.
Equipment Needed for Night Sky Photography
Night sky photography requires specific equipment to capture the beauty of the night sky. The following is a list of essential equipment for night sky photography:
- Camera: A camera with manual controls is ideal for night sky photography. A full-frame camera with high ISO capabilities is recommended, as it allows for better low-light performance.
- Tripod: A sturdy tripod is necessary to keep the camera stable during long exposures. A tripod with a ball head or gimbal head is recommended, as it provides smooth movement and precise control of the camera.
- Remote shutter release: A remote shutter release is helpful in preventing camera shake during long exposures. It allows the photographer to trigger the camera’s shutter without touching it, reducing the risk of camera shake.
- Wide-angle lens: A wide-angle lens is ideal for capturing the vastness of the night sky. A lens with a focal length of 14mm or wider is recommended.
- Polarizing filter: A polarizing filter is useful for reducing glare and reflections from celestial objects, such as the moon and planets.
- Lens cleaner: A lens cleaner is necessary for keeping the camera lens clean and free from dust and debris.
- Headlamp or flashlight: A headlamp or flashlight is useful for navigating in the dark and adjusting equipment settings.
- Warm clothing: Night sky photography often requires waiting for several hours for the right conditions, so warm clothing is essential for staying comfortable during long exposures.
- Weather-resistant gear: It is important to have weather-resistant gear, such as a waterproof jacket and gloves, to protect against inclement weather.
- Backpack: A backpack is necessary for carrying all the equipment and supplies needed for night sky photography. A sturdy backpack with multiple compartments is recommended.
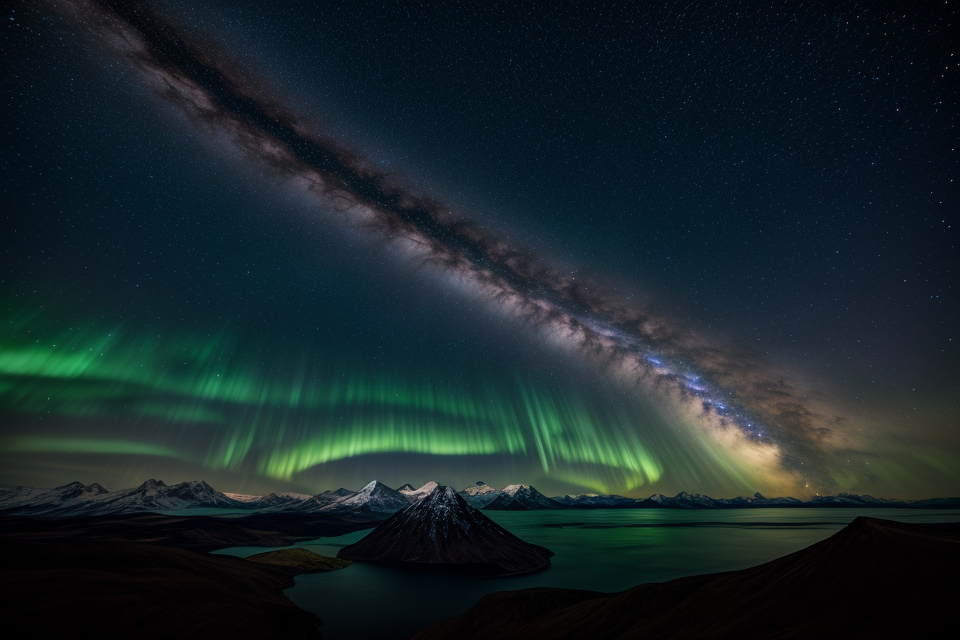
Tips for Capturing the Milky Way
The Milky Way is a breathtaking sight in the night sky, and capturing it through photography requires careful planning and execution. Here are some tips to help you capture stunning images of the Milky Way:
- Choose the right location: Look for a location that is far away from any sources of light pollution, such as cities or industrial areas. The best locations are usually rural areas, high mountains, or remote wilderness areas.
- Plan your shot: Use a planetarium software or an app to determine the time and location of the Milky Way. This will help you plan your shot and choose the right time to take it.
- Use a wide-angle lens: A wide-angle lens will allow you to capture the full extent of the Milky Way, and its appearance will be more striking.
- Use a tripod: A tripod will help you keep your camera steady and avoid blurry images.
- Use a remote shutter release: This will help you avoid any camera shake that could ruin your shot.
- Use a low ISO: A low ISO will help you capture more detail and avoid noise in your images.
- Use a long exposure: A long exposure will allow you to capture the full extent of the Milky Way and bring out its detail.
- Use a composition that leads the eye: Use a composition that leads the eye to the Milky Way, such as a diagonal line or a leading line.
- Experiment with different angles: Try to capture the Milky Way from different angles to add variety to your images.
- Take multiple shots: Take multiple shots at different exposures and blend them together in post-processing to bring out more detail in the Milky Way.
By following these tips, you can capture stunning images of the Milky Way that will leave your audience in awe.
Planning Your Night Sky Photography Shoot
Finding the Right Location
Choosing the perfect location for your night sky photography shoot is crucial to the success of your images. The ideal location should offer a clear view of the night sky, minimal light pollution, and interesting foreground elements to add depth and context to your photographs. Here are some tips to help you find the right location for your night sky photography:
Consider the Time of Year
The time of year can greatly impact the quality of your night sky photographs. During the summer months, the nights are longer, and the sun dips lower in the sky, providing a more dramatic sky with deeper colors. On the other hand, during the winter months, the days are shorter, and the sun is lower in the sky, creating a more horizontal landscape with a wider view of the night sky.
Look for Dark Sky Locations
Dark sky locations are ideal for night sky photography because they offer minimal light pollution, which can cause unwanted glare and hinder your ability to capture the Milky Way and other celestial objects. Look for locations that are far away from any major cities or towns, and try to find a spot that is elevated and offers a clear view of the horizon.
Use Online Resources
There are several online resources available that can help you find the perfect location for your night sky photography shoot. Websites like DarkSiteFinder and ClearDarkSky allow you to search for dark sky locations based on your specific location and desired date. These resources can also provide information on the best times for stargazing and celestial object visibility.
Scout Your Location in Person
Once you have identified a potential location, it’s important to scout the area in person before your shoot. This will allow you to get a feel for the terrain, identify any potential obstacles, and assess the best angles for your photographs. Consider visiting the location during the day to get a sense of the landscape and identify any interesting foreground elements that can be incorporated into your photographs.
Obtain Permission
If you plan to shoot at a location that is privately owned, such as a park or private property, it’s important to obtain permission beforehand. Many locations require a permit or fee for photography, so be sure to research the requirements in advance and follow any guidelines or rules.
By taking the time to carefully plan and scout your location, you can increase your chances of capturing stunning night sky photographs that showcase the beauty and wonder of the celestial world.
Time of Day and Time of Year Considerations
When it comes to capturing stunning night sky photographs, timing is crucial. The time of day and time of year can significantly impact the quality of your shots. In this section, we will delve into the factors you need to consider when planning your night sky photography shoot.
Choosing the Right Time of Day
The best time for night sky photography is during the hours between twilight and midnight. During these hours, the sky is dark enough to bring out the stars, but there is still enough ambient light to capture details in the foreground. The blue hour, which occurs just after sunset, can create beautiful, warm light for your shots.
Selecting the Ideal Time of Year
The time of year can also play a role in your night sky photography. The summer months offer longer days and warmer temperatures, making it easier to stay out late and capture shots. In contrast, winter nights are shorter, but the cold weather can create stunning, crisp shots with frosty landscapes.
Dealing with Light Pollution
Light pollution can be a significant obstacle when it comes to night sky photography. Urban areas with high levels of light pollution can make it difficult to see the stars and create long exposure shots. To overcome this challenge, consider finding a location with less light pollution, such as a remote wilderness area or a high mountain peak. You can also use techniques like shooting during the blue hour or using a polarizing filter to reduce the impact of light pollution.
Seasonal Phenomena
Seasonal phenomena, such as meteor showers and eclipses, can create unique opportunities for night sky photography. Research these events in advance and plan your shoot accordingly. Keep in mind that some locations may require special permits or access, so it’s essential to plan ahead and follow any necessary guidelines.
By considering the time of day, time of year, and light pollution, you can plan your night sky photography shoot to capture stunning, memorable images. With the right preparation and planning, you’ll be well on your way to mastering night sky photography.
Weather Conditions and Moon Phases
Proper planning is essential for capturing stunning night sky photographs. Weather conditions and moon phases are two critical factors to consider when planning your night sky photography shoot.
Weather Conditions
Clear skies are ideal for night sky photography, as they provide the best opportunity to capture a vast and unobstructed view of the stars. However, even on clear nights, atmospheric conditions can still affect the quality of your photographs. Here are some key weather factors to consider:
- Humidity: High humidity can create a “fog” effect in the sky, which can be interesting in some situations but can also ruin your photographs. It’s essential to check the humidity levels before you start shooting.
- Wind: Wind can cause camera shake and affect the stability of your tripod. If the wind is too strong, it may be necessary to reschedule your shoot or find a more sheltered location.
- Temperature: Temperature can affect the way your camera functions and the comfort of you and your equipment. Extremely cold temperatures can cause battery issues and make it difficult to operate your camera.
Moon Phases
The phase of the moon can have a significant impact on your night sky photographs. A full moon provides a lot of light, which can make it difficult to capture the stars and constellations. On the other hand, a new moon provides minimal light, making it easier to capture the stars but also increasing the difficulty of shooting landscapes. Here are some key moon phase considerations:
- Full Moon: During a full moon, the moon is fully illuminated, and its light can overpower the stars in your photographs. If you’re planning to capture star trails or the movement of the stars, a full moon is not the best time to shoot. However, if you’re interested in capturing a landscape illuminated by the moonlight, a full moon can be an excellent opportunity.
- New Moon: During a new moon, the moon is not visible in the sky, and its light has minimal impact on your photographs. This is the best time to capture star trails and the movement of the stars. However, it can be challenging to capture landscapes, as there is minimal light available.
- Gibbous and Crescent Moons: These phases occur when the moon is partially illuminated, and its light can affect your photographs depending on the time of night and the position of the moon in the sky. These phases can provide good opportunities for both star photography and landscape photography, depending on your specific goals.
By considering weather conditions and moon phases, you can plan your night sky photography shoot to capture the best possible images.
Planning Your Shot: Composition and Framing
Capturing stunning night sky photographs requires more than just pointing your camera at the sky and pressing the shutter button. Composition and framing play a crucial role in creating visually appealing images that convey the beauty and grandeur of the night sky. In this section, we will discuss the key principles of composition and framing in night sky photography.
The Rule of Thirds
One of the most fundamental principles of composition in photography is the rule of thirds. This principle suggests that an image should be divided into thirds, both horizontally and vertically, creating a grid of nine equal parts. By placing the main subject of the image at one of the intersection points of this grid, the image becomes more visually appealing and dynamic. In night sky photography, you can use the rule of thirds to position the Milky Way, stars, or other celestial objects in the frame.
Leading Lines
Leading lines are lines in the image that lead the viewer’s eye from the foreground to the background or from the left to the right side of the image. These lines can be natural or man-made and can help create a sense of depth and dimension in the image. By incorporating leading lines in your night sky photographs, you can draw the viewer’s attention to the main subject and create a more engaging composition. Examples of leading lines in night sky photography include tree branches, telephone wires, or even the light trails of moving vehicles.
Framing
Framing refers to the use of elements in the foreground to frame the main subject of the image. This technique can be used to create a sense of depth and scale in the image, as well as to draw the viewer’s attention to the main subject. In night sky photography, you can use natural elements such as trees, rocks, or buildings to frame the night sky or celestial objects. This technique can also be used to create a sense of scale by comparing the size of the main subject to the surrounding environment.
Balancing Elements
Finally, it is important to balance the elements in your night sky photographs. This means ensuring that the main subject of the image is not overpowered by other elements in the frame. For example, if you are photographing the Milky Way, you may want to balance the brightness of the galaxy with the darkness of the surrounding night sky. Similarly, if you are photographing stars, you may want to balance the brightness of the stars with the darkness of the foreground. By carefully balancing the elements in your image, you can create a more harmonious and visually appealing composition.
In conclusion, composition and framing are crucial elements in night sky photography. By incorporating the rule of thirds, leading lines, framing, and balancing elements, you can create visually appealing and dynamic images that capture the beauty and grandeur of the night sky.
Taking the Shot: Techniques and Settings
Choosing the Right Camera Settings
When it comes to night sky photography, choosing the right camera settings is crucial to capturing stunning images. Here are some key factors to consider:
ISO
ISO is a measure of the camera’s sensitivity to light. A higher ISO setting allows for more light to be captured in low-light situations, but it can also introduce noise into the image. For night sky photography, a low ISO setting (between ISO 100 and ISO 400) is recommended to capture as much detail as possible without introducing excessive noise.
Shutter Speed
Shutter speed controls the length of time the camera’s sensor is exposed to light. A slower shutter speed allows more light to enter the camera, which is important for capturing the faint light of the stars. However, a slower shutter speed can also cause the stars to appear as streaks, known as star trails. To avoid this, a shutter speed between 15 seconds and 30 seconds is recommended.
Aperture
Aperture controls the size of the camera’s aperture, which determines how much light enters the camera. A wider aperture (a smaller f-number) allows more light to enter the camera, but it can also create a shallower depth of field, which can be problematic when trying to capture a wide-angle view of the night sky. A narrower aperture (a larger f-number) allows for a deeper depth of field, but it can also reduce the amount of light entering the camera. For night sky photography, a narrow aperture (between f/5.6 and f/11) is recommended to maximize the amount of light entering the camera while minimizing the amount of noise.
White Balance
White balance controls the color temperature of the image. In daylight, the white balance is typically set to auto, but at night, the color temperature of the sky changes. To capture the true color of the night sky, it is recommended to set the white balance to “tungsten” or “cloudy” to capture the blue tones of the night sky.
Overall, choosing the right camera settings for night sky photography requires careful consideration of ISO, shutter speed, aperture, and white balance. By carefully selecting these settings, photographers can capture stunning images of the night sky.
Using a Tripod and Remote Shutter Release
A tripod is an essential tool for night sky photography. It allows you to keep your camera steady and helps you capture sharp and well-framed images of the night sky. Additionally, using a remote shutter release will help you avoid camera shake and ensure that your images are sharp and well-exposed.
A tripod will also allow you to use longer exposures, which can capture more light and produce brighter images of the night sky. This is especially useful when photographing faint objects such as nebulas and star clusters. Using a remote shutter release will allow you to trigger the camera’s shutter without touching it, which can help reduce camera shake and prevent blurry images.
When using a tripod, it is important to level the camera properly. This can be done by using the tripod’s legs or a tripod leveling tool. Leveling the camera will ensure that your images are straight and not tilted.
Additionally, using a remote shutter release will allow you to keep your camera’s shutter open for longer periods of time without having to touch it. This can be especially useful when photographing the night sky during the winter months when the air is colder and can cause your hands to become numb.
In summary, using a tripod and remote shutter release is essential for capturing sharp and well-exposed images of the night sky. They will help you avoid camera shake and enable you to use longer exposures, which can capture more light and produce brighter images.
Experimenting with Different Lenses and Filters
Capturing the beauty of the night sky requires the right equipment and knowledge of how to use it. One of the key factors in achieving stunning night sky photographs is experimenting with different lenses and filters.
Different lenses offer unique perspectives and capabilities, allowing photographers to capture a wide range of subjects in the night sky. Wide-angle lenses, such as a 14mm or 24mm, are ideal for capturing sweeping landscapes and the Milky Way. Telephoto lenses, on the other hand, are perfect for capturing detailed images of celestial objects, such as the Moon or planets.
Filters are another essential tool for night sky photography. Polarizing filters reduce glare and reflections, while long exposure filters allow for longer exposure times, capturing more light and detail in the night sky. ND (neutral density) filters are also useful, allowing for even longer exposure times and enabling the use of wider apertures for greater depth of field.
Experimenting with different lenses and filters is key to mastering night sky photography. Each photographer will have their own preferences and styles, and by trying out different equipment, they can find the perfect combination for their unique vision. With the right lenses and filters, photographers can capture stunning images of the night sky, whether they are capturing sweeping landscapes or detailed celestial objects.
Tips for Capturing Light Trails and Star Trails
Capturing light trails and star trails is an essential part of night sky photography. It adds a sense of motion and dynamism to your images, making them more interesting and compelling. Here are some tips to help you capture stunning light and star trails:
Choose the Right Location
To capture light trails, you need to find a location with plenty of streetlights or other artificial lights that will create streaks of light in your images. For star trails, you need to find a location with minimal light pollution to ensure that the stars appear bright and clear.
Use a Wide-Angle Lens
A wide-angle lens is essential for capturing light and star trails because it allows you to capture a wide field of view, including the streaks of light and the stars. A wide-angle lens will also help you capture more of the night sky, making your images more dramatic and striking.
Use a Long Exposure
Long exposures are necessary for capturing light and star trails because they allow the camera to capture the movement of the lights and stars over a longer period of time. A longer exposure will result in longer streaks of light and more defined star trails.
Use a Tripod
Using a tripod is essential for night sky photography because it helps you keep your camera still during the long exposure. A tripod will also allow you to use a remote shutter release or the camera’s self-timer, which will help you avoid camera shake and ensure that your images are sharp and well-exposed.
Use an Intervalometer
An intervalometer is a useful tool for capturing star trails because it allows you to take multiple images over a period of time and then combine them into a single image. This will help you create a more detailed and accurate star trail image.
Use Post-Processing Techniques
Finally, post-processing techniques can help you enhance the light and star trails in your images. You can use software like Adobe Lightroom or Photoshop to adjust the exposure, contrast, and color balance of your images, as well as to add special effects like color grading or light streaks.
Post-Processing and Enhancing Your Night Sky Photography
Importing and Organizing Your Images
After capturing the perfect night sky image, the next step is to import and organize your images. This may seem like a small task, but it is crucial to ensure that your images are easily accessible and well-organized for editing. Here are some tips for importing and organizing your night sky photography images:
Importing Your Images
- Choose a suitable software: The first step in importing your images is to choose a suitable software. Adobe Lightroom and Adobe Photoshop are two popular options for importing and editing images. Both software options have their pros and cons, so it is essential to choose the one that best suits your needs.
- Connect your camera: If you are using a DSLR camera, you will need to connect it to your computer to transfer the images. Most cameras come with software that allows you to transfer images from the camera to the computer.
- Import your images: Once your camera is connected, you can import your images into the software. It is essential to ensure that your images are in a safe and accessible location on your computer.
Organizing Your Images
- Create folders: Once your images are imported, create folders to organize them. You can create folders based on the date, location, or type of image. This will make it easier to find and edit specific images.
- Add metadata: Metadata is information about your images, such as the date, location, and camera settings. Adding metadata to your images will help you to easily search and sort your images.
- Back up your images: It is essential to back up your images regularly to prevent loss of data. You can use an external hard drive or cloud storage to back up your images.
By following these tips, you can ensure that your night sky photography images are well-organized and easily accessible for editing.
Adjusting the Exposure and Contrast
Properly adjusting the exposure and contrast of your night sky photographs is crucial to achieving stunning results. In this section, we will discuss the different techniques and tools you can use to optimize the exposure and contrast of your night sky images.
Understanding Exposure and Contrast
Exposure refers to the amount of light that enters the camera’s sensor when capturing an image. A well-exposed image should have the right balance of light and dark areas, which can be achieved by adjusting the exposure settings of your camera. Contrast, on the other hand, is the difference between the lightest and darkest parts of an image. Enhancing the contrast of your night sky photographs can make the stars appear brighter and more vivid.
Adjusting Exposure in Post-Processing
When editing your night sky photographs, you can adjust the exposure using post-processing software like Adobe Lightroom or Photoshop. The goal is to make the stars appear brighter and more prominent in the image. Here are some steps you can follow:
- Import your image into the post-processing software.
- Adjust the exposure slider to increase the brightness of the stars. Be careful not to overexpose the image, as this can result in blown-out highlights.
- Use the highlights and shadows sliders to further refine the exposure, if necessary.
- Preview the changes to the exposure by zooming in on the image and checking for any overexposed or underexposed areas.
Enhancing Contrast
To enhance the contrast of your night sky photographs, you can use various techniques in post-processing software. Here are some steps you can follow:
- Adjust the contrast slider to increase the overall contrast of the image. Be careful not to overdo it, as this can result in an unnatural look.
- Use the curves or levels tools to fine-tune the contrast, adjusting the individual curves or levels for the shadows, midtones, and highlights.
- Preview the changes to the contrast by zooming in on the image and checking for any over- or underexposed areas.
Balancing Exposure and Contrast
Balancing the exposure and contrast of your night sky photographs is essential to achieve a natural and stunning result. Experiment with different exposure and contrast settings to find the best balance for your images. Remember that it’s important to preview your changes frequently to ensure that the final result looks natural and not overprocessed.
Enhancing the Colors and Details
When it comes to enhancing the colors and details in your night sky photography, there are several techniques you can use to improve the overall appearance of your images. Here are some tips to consider:
- Adjust the exposure: One of the most important aspects of enhancing the colors and details in your night sky photography is adjusting the exposure. This will help bring out the details in the darker areas of the image, such as the stars and the landscape. You can use software like Adobe Lightroom or Photoshop to adjust the exposure of your images.
- Enhance the colors: Another technique for enhancing the colors in your night sky photography is to adjust the color balance of your image. This can be done by adjusting the white balance, saturation, and hue of your image. By adjusting these settings, you can enhance the colors in your image and make them more vibrant and appealing.
- Add contrast: Adding contrast to your night sky photography can help bring out the details in the image and create a more dynamic and interesting composition. You can use software like Adobe Lightroom or Photoshop to add contrast to your images.
- Use layers: Using layers in your image editing software can be a powerful tool for enhancing the colors and details in your night sky photography. By adding layers to your image, you can experiment with different effects and adjustments, such as brightness, contrast, and saturation, to create a more dynamic and interesting composition.
- Experiment with presets: Another way to enhance the colors and details in your night sky photography is to experiment with presets. Presets are pre-made adjustments that can be applied to your images with just a few clicks. You can use software like Adobe Lightroom or Photoshop to apply presets to your images. Experiment with different presets to see which ones work best for your images.
Overall, enhancing the colors and details in your night sky photography requires a combination of techniques, including adjusting the exposure, enhancing the colors, adding contrast, using layers, and experimenting with presets. By using these techniques, you can create stunning and vibrant night sky images that captivate and inspire your audience.
Adding a Lens Flare or Star Effect
Creating a stunning night sky photograph is not only about capturing the perfect moment, but also about enhancing the image during post-processing. One way to add drama and interest to your night sky photos is by adding a lens flare or star effect.
What is a Lens Flare?
A lens flare is a bright, white spot or streak of light that appears in the image due to reflections off the lens elements. While lens flares can be a nuisance during daytime photography, they can add a touch of magic to night sky photos.
How to Add a Lens Flare or Star Effect
- Identify the location of the lens flare in your original image. This can be done by looking for a bright, white spot or streak of light that appears in the night sky.
- Create a new layer in your photo editing software and fill it with black.
- Using a soft brush, paint over the area where the lens flare should appear. This will create a transparent lens flare effect.
- Adjust the opacity and blending mode of the lens flare layer until it looks natural and enhances the image.
- To add star effects, you can use the same technique to create star bursts around bright stars in the image.
Tips for Adding Lens Flares and Star Effects
- Keep it subtle – A little goes a long way. Avoid overdoing it as it can quickly become tacky.
- Use high-quality images – For the best results, use high-resolution images and make sure that the stars are sharp and clear.
- Experiment with different colors – You can experiment with different colors for the lens flare and star effects. For example, try using warm colors like orange and yellow for a more dramatic effect.
- Add contrast – To enhance the impact of the lens flare and star effects, try adding contrast to the image. This can be done by adjusting the exposure, shadows, and highlights.
By following these steps, you can add a lens flare or star effect to your night sky photos, creating stunning images that are sure to impress.
Sharing Your Work and Getting Inspired
Sharing your night sky photography is an excellent way to connect with other photographers, receive feedback, and get inspired. There are several platforms where you can share your work, including social media, photography forums, and online galleries.
- Social Media: Platforms like Instagram, Facebook, and Twitter are great places to share your night sky photos. You can use hashtags to increase the visibility of your posts and connect with other photographers. Some popular hashtags include #astrophotography, #nightsky, and #milkyway.
- Photography Forums: Online photography forums, such as Reddit’s r/astrophotography or the Night Sky Photography group on Flickr, offer a community of photographers who are passionate about night sky photography. These forums are a great place to ask questions, share your work, and receive constructive feedback.
- Online Galleries: There are several online galleries dedicated to night sky photography, such as NASA’s Astronomy Picture of the Day and The World at Night. Submitting your work to these galleries can help you gain exposure and inspire others.
Getting inspired by other photographers is also an essential part of mastering night sky photography. By studying the work of experienced photographers, you can learn new techniques, explore different compositions, and discover new locations for night sky photography.
Some ways to get inspired include:
- Following photographers you admire on social media or photography forums.
- Visiting photography exhibitions or galleries that feature night sky photography.
- Reading photography books or blogs that focus on night sky photography.
- Attending photography workshops or events that offer night sky photography sessions.
Remember that copying the work of others is not the goal. Instead, use their work as a source of inspiration to develop your unique style and vision in night sky photography.
Night Sky Photography Tips from Pros
Capturing stunning night sky photographs requires more than just a good camera and basic photography skills. It takes patience, persistence, and a deep understanding of the technical aspects of night photography. To help you improve your night sky photography skills, we have compiled some valuable tips from professional photographers.
- Plan Your Shot
Professional photographers stress the importance of planning your shot beforehand. This includes scouting the location, identifying the celestial objects you want to capture, and determining the best time to shoot based on the lunar cycle and weather conditions. - Use a Sturdy Tripod
A sturdy tripod is essential for night sky photography, as it helps you keep your camera steady and avoid blurry images. It also allows you to use longer exposures, which are necessary for capturing the details of the night sky. - Use a Remote Shutter Release or Timer
To avoid camera shake, use a remote shutter release or set your camera’s timer to trigger the shutter. This will help you achieve sharp images and reduce the risk of camera shake. - Use a Polarizing Filter
A polarizing filter can help reduce glare and reflections from celestial objects, such as the moon and planets. It can also help bring out the colors of the night sky and make for more dramatic images. - Bracket Your Shots
Bracketing involves taking multiple shots of the same scene at different exposure settings. This can help ensure that you capture the best possible image, regardless of the lighting conditions. - Use a High ISO Setting
To capture the details of the night sky, you will need to use a high ISO setting. This will allow you to use a faster shutter speed and avoid blurry images. However, be careful not to overdo it, as this can lead to noise in your images. - Experiment with Long Exposures
Long exposures can help you capture the movement of celestial objects, such as stars and the moon. Experiment with different exposure times to see what works best for your subject and location. - Post-Process Your Images
Finally, it’s important to post-process your images to bring out their full potential. This includes adjusting the exposure, contrast, and color balance, as well as removing noise and enhancing the details of the night sky. With the right techniques and tools, you can create stunning night sky photographs that will inspire and awe.
Resources for Learning More About Night Sky Photography
- Online communities and forums
- AstroPhotography Discord server
- Cloudy Nights website
- Stargazers Lounge forum
- YouTube channels
- David Kingham
- The Night Sky Guy
- Photography with John
- Podcasts
- The Astro Imaging Channel
- The Stargazers Lounge
- The Photography Detective
- Books
- “Night Sky Photography: An Introduction to Astrophotography” by John W. Sailors
- “The Practical Guide to Night Sky Photography” by Nicholas A. Veronico
- “Astrophotography for the 21st Century” by David M. J. Halkett
- Workshops and classes
- Starry Night Photography workshops
- Astro Photography Academy
- Online courses on platforms like Udemy and Coursera
- Conferences and events
- International Dark-Sky Association events
- Star Party events
- Astrofest in the UK
These resources offer a wealth of information, tips, and techniques for improving your night sky photography skills. By participating in online communities, watching YouTube videos, listening to podcasts, reading books, and attending workshops and events, you can deepen your understanding of the craft and learn from experienced photographers. This will help you to master the art of night sky photography and create stunning images that capture the beauty and wonder of the night sky.
Joining Online Communities and Photography Contests
- Benefits of joining online communities:
- Access to expert advice and tips
- Opportunities to learn from other photographers
- Possibility of receiving constructive criticism
- Exposure to various techniques and editing styles
- Importance of participating in photography contests:
- Motivation to improve and take better photos
- Opportunity to showcase your work to a wider audience
- Possibility of winning awards and recognition
- Networking with other photographers and potential clients
- Popular online communities for night sky photographers:
- 500px
- Flickr
- Facebook groups (e.g. “Astrophotography”)
- Recommended photography contests for night sky photography:
- Astronomy Photographer of the Year
- International Earth & Sky Photo Contest
- The Society for Photographic Education’s InSight Photography Competition
- National Geographic’s Nature Photography Contest
- Tips for participating in online communities and contests:
- Share your work, but also take the time to appreciate and comment on others’ work
- Ask questions and seek advice from more experienced photographers
- Participate in discussions and offer your own insights and experiences
- Keep an open mind and be willing to learn from others
Tips for Staying Safe and Respectful When Shooting Night Sky Photography
Shooting night sky photography can be a magical experience, but it’s important to remember that you’re not the only one who wants to capture the beauty of the night sky. To ensure that you stay safe and respectful while shooting night sky photography, here are some tips to keep in mind:
- Be mindful of your surroundings: Before you start shooting, take a moment to assess your surroundings. Look for any signs of wildlife, such as birds or animals, and make sure that you’re not disturbing them. If you’re shooting in a public place, be mindful of other people around you and try not to block their view.
- Use a tripod: Using a tripod can help you keep your camera steady and avoid blurry shots. It can also help you frame your shot more accurately and keep your camera in the same position for longer periods of time.
- Avoid using flash: Flash can be disruptive to other photographers and can ruin your night sky photos. Instead, use a low ISO and long exposure times to capture the stars and the night sky.
- Don’t litter: When you’re shooting night sky photography, you’ll likely be in a dark and secluded area. This means that there may not be many trash cans around. Make sure to bring a trash bag with you and pack out any trash that you generate.
- Respect the land: If you’re shooting on private property, make sure that you have permission to be there. If you’re shooting on public land, make sure to follow any rules or regulations that apply to the area. Additionally, be mindful of any signs or warnings that you see and respect any closures or restrictions that are in place.
By following these tips, you can help ensure that you stay safe and respectful while shooting night sky photography. This will not only help you capture stunning photos, but it will also help protect the places that you love.
The Future of Night Sky Photography: Technology and Trends
The field of night sky photography is constantly evolving, with new technologies and trends emerging that are shaping the way photographers capture and process their images. In this section, we will explore some of the exciting developments that are shaping the future of night sky photography.
Advancements in Camera Technology
One of the most significant developments in night sky photography is the advancement of camera technology. With the advent of full-frame sensors and high-resolution cameras, photographers are now able to capture more detail and produce higher-quality images than ever before. Additionally, the development of low-light sensitivity has made it possible to capture images in darker conditions, opening up new possibilities for night sky photography.
Use of Drone Technology
Another trend that is transforming night sky photography is the use of drone technology. Drones equipped with cameras can be flown to remote locations, allowing photographers to capture stunning views of the night sky from unique perspectives. Drones also offer the advantage of being able to fly at low altitudes, which can create dramatic compositions and capture the movement of the stars.
Use of Artificial Intelligence
Artificial intelligence (AI) is also being used to enhance night sky photography. AI algorithms can be used to identify and remove noise from images, making it possible to capture even more detail in low-light conditions. Additionally, AI can be used to enhance the colors and contrast of night sky images, creating more vibrant and dramatic results.
Use of Virtual Reality
Finally, virtual reality (VR) technology is being used to create immersive experiences of the night sky. By combining 360-degree images with VR headsets, photographers can transport viewers to remote locations and allow them to experience the beauty of the night sky in a completely new way. This technology has the potential to revolutionize the way we experience and appreciate night sky photography.
In conclusion, the future of night sky photography is bright, with new technologies and trends emerging that are shaping the way photographers capture and process their images. As these developments continue to evolve, it will be exciting to see how they will transform the field of night sky photography in the years to come.
Ethical Considerations and Leaving No Trace
As responsible photographers, it is crucial to consider the ethical implications of our actions while capturing night sky photographs. Leaving no trace means ensuring that our presence has minimal impact on the environment and surrounding ecosystems. Here are some guidelines to follow:
- Respect the Environment: When shooting at night, try to minimize your impact on the environment. Avoid disturbing wildlife, plants, or other natural elements in the area. Stick to established trails and avoid creating new paths.
- No Littering: Make sure to properly dispose of any trash or waste generated during your shoot. This includes food wrappers, packaging, and any equipment you may have brought along. Always leave the area cleaner than you found it.
- No Flash Photography: Flash photography can be disruptive to wildlife and can disturb the natural environment. It can also create a glare in your images, so it’s best to avoid using flash.
- No Trespassing: Be mindful of private property boundaries and obtain necessary permissions before shooting on private land. Always respect the rights of landowners and refrain from trespassing.
- Respect the Dark Sky: Many locations are designated as “Dark Sky” areas to protect the night sky from light pollution. Be mindful of these areas and avoid using flash or artificial lighting that could disturb the darkness.
- Share Your Knowledge: Share your knowledge of responsible night sky photography with others. Encourage fellow photographers to adopt ethical practices and leave no trace.
By following these guidelines, you can ensure that your night sky photography has a minimal impact on the environment and surrounding ecosystems. Remember, we are the stewards of the natural world, and it’s our responsibility to preserve its beauty for future generations.
Inspiring Others to Enjoy and Protect the Night Sky
- Share your work and knowledge with others
- Encourage others to explore and appreciate the beauty of the night sky
- Educate others on the importance of responsible night sky photography practices
- Advocate for the protection of dark skies and the preservation of natural nightscapes
- Support organizations and initiatives dedicated to promoting dark sky conservation and responsible night sky use
- Be a role model for sustainable and ethical night sky photography practices
- Contribute to the community by sharing your experiences, tips, and techniques with others
- Collaborate with other photographers, scientists, and stakeholders to promote the appreciation and protection of the night sky
- Use your photography to raise awareness about the importance of preserving dark skies and the negative impacts of light pollution
- Support and participate in events and campaigns that promote the protection of the night sky and responsible night sky use
- Foster a sense of stewardship and responsibility among fellow photographers and the general public
- Inspire others to appreciate the beauty of the night sky and to take action to protect it for future generations
- Contribute to the growth and development of the night sky photography community by sharing your knowledge and experiences, and by promoting responsible and sustainable practices.
Final Thoughts and Encouragement for Night Sky Photography Enthusiasts
After mastering the technical aspects of night sky photography and applying post-processing techniques, it’s important to reflect on your progress and stay motivated. Here are some final thoughts and encouragement for night sky photography enthusiasts:
Embrace the Challenge
Night sky photography can be challenging, but it’s also incredibly rewarding. Embrace the challenge and don’t be afraid to experiment and try new techniques. Remember that each photograph represents a unique moment in time and captures the beauty of the universe.
Share Your Work
Sharing your night sky photography with others is a great way to connect with like-minded individuals and receive feedback. Social media platforms, photography forums, and local camera clubs are excellent places to share your work and connect with other photographers.
Stay Inspired
Staying inspired is crucial for any photographer, especially when it comes to capturing the night sky. Look for inspiration in nature, art, and science. Attend star gazing events, visit planetariums, and read books about astronomy and astrophysics.
Keep Learning
Night sky photography is a constantly evolving field, and there’s always something new to learn. Stay up-to-date with the latest equipment, techniques, and software. Attend workshops, read books, and watch online tutorials to expand your knowledge and skills.
Have Fun
Above all, remember to have fun and enjoy the process of capturing the night sky. Night sky photography is a hobby that allows you to connect with nature, explore new places, and create beautiful images. Don’t forget to appreciate the beauty of the night sky and the moments you capture through your lens.
FAQs
1. What equipment do I need for night sky photography?
To capture stunning night sky photographs, you’ll need a camera with manual controls, a tripod, and a remote shutter release or a timer function. It’s also recommended to use a wide-angle lens, as this allows you to capture more of the night sky in your shots.
2. When is the best time to shoot night sky photography?
The best time for night sky photography is during the summer months when the sky is clear and the days are longer. However, you can still capture great shots during other times of the year, provided you plan your shoot accordingly. Look for new moon phases or times when the sky is clear and there’s minimal light pollution.
3. How do I choose the right location for night sky photography?
Look for locations that offer a clear view of the night sky, away from any sources of light pollution. Ideal locations include high altitudes, remote wilderness areas, or the beach. You can also use a tool like the Light Pollution Map to find the best locations near you.
4. How do I set up my camera for night sky photography?
Set your camera to manual mode and use a low ISO (100-400), a wide aperture (f/2.8-f/4), and a long exposure (15-30 seconds) to capture the night sky. You may also want to consider using a polarizing filter to reduce glare and enhance colors. Make sure to use a remote shutter release or the timer function to avoid camera shake.
5. How do I edit my night sky photographs?
Editing your night sky photographs involves enhancing the colors, adjusting the brightness and contrast, and reducing noise. You can use software like Adobe Lightroom or Photoshop to edit your shots. Start by adjusting the white balance, then boost the blue and green tones, and adjust the brightness and contrast to bring out the details in the sky. Finally, reduce noise using the “Reduce Noise” tool.
6. What are some tips for capturing the Milky Way?
To capture the Milky Way, you’ll need to find a location with a clear view of the galactic center, away from any sources of light pollution. Shoot during the summer months when the galactic center is visible in the southern sky. Use a wide-angle lens and a long exposure (15-30 seconds) to capture the detail in the Milky Way. Edit your shots to enhance the colors and reduce noise.
7. How do I avoid camera shake when shooting long exposures?
To avoid camera shake when shooting long exposures, use a tripod and a remote shutter release or the timer function. You can also try using a shutter release cable or the self-timer function on your camera. It’s also important to keep your camera still while taking the shot, so try to brace it against a solid object or use a gorilla pod for added stability.


