Astrophotography is the art of capturing images of celestial objects and phenomena, such as stars, planets, nebulas, and galaxies. To successfully capture these breathtaking scenes, astrophotographers need to have a deep understanding of the equipment, techniques, and post-processing methods required to produce stunning images of the night sky. In this comprehensive guide, we will explore the essential components of astrophotography, including cameras, lenses, mounts, and software, as well as tips for planning and executing successful astrophotography sessions. Whether you’re a seasoned astrophotographer or just starting out, this guide will provide you with the knowledge and skills needed to capture stunning images of the night sky.
Understanding Astrophotography
The Basics of Astrophotography
Astrophotography is the art and science of capturing images of celestial objects and events, such as stars, planets, nebulas, and galaxies. It is a fascinating and challenging field that requires both technical expertise and artistic creativity.
There are several types of astrophotography, including:
- Deep sky astrophotography: capturing images of distant objects such as galaxies, nebulas, and star clusters.
- Solar astrophotography: capturing images of the sun, including sunspots, solar flares, and solar eclipses.
- Lunar astrophotography: capturing images of the moon, including lunar eclipses, craters, and mountains.
- Planetary astrophotography: capturing images of planets, including their moons, atmospheres, and surface features.
To get started in astrophotography, you will need a few key pieces of equipment, including:
- A camera: any camera with manual settings will work, but a DSLR or mirrorless camera with interchangeable lenses is ideal.
- A tripod: to keep the camera steady during long exposures.
- A mount: to track the movement of the stars and keep the camera steady during long exposures.
- A remote shutter release: to avoid camera shake when taking long exposures.
- A wide-angle lens: to capture a wide field of view and include a lot of stars in the image.
With the right equipment and some basic knowledge of astrophotography techniques, you can capture stunning images of the night sky and share your passion for astronomy with others.
Choosing the Right Camera for Astrophotography
Choosing the right camera for astrophotography is a crucial step in capturing stunning images of the night sky. To ensure that you get the best results, it is important to understand the key factors that influence the performance of your camera in low light conditions.
Understanding Sensor Size and ISO Settings
The sensor size and ISO settings of your camera play a significant role in astrophotography. A larger sensor will generally produce better results in low light conditions, as it can capture more light and reduce noise. Full-frame sensors are ideal for astrophotography, as they offer the highest sensitivity and least amount of noise.
However, full-frame cameras can be expensive and may not be practical for all photographers. In this case, APS-C or micro four-thirds sensors can still produce great results, especially when paired with a wide-angle lens.
ISO settings also play a critical role in astrophotography. A lower ISO setting will produce less noise, but may require longer exposure times. A higher ISO setting will allow for shorter exposure times, but may result in more noise in the image. It is important to find the right balance between exposure time and ISO setting to achieve the best results.
Camera Settings for Astrophotography
In addition to sensor size and ISO settings, there are several other camera settings that are important for astrophotography. These include:
- Long exposure mode: This mode allows for longer exposure times, which are necessary for capturing faint details in the night sky.
- Live view: Live view allows you to preview the image on the camera’s LCD screen, making it easier to focus and frame your shot.
- Manual focus: Autofocus may not work effectively in low light conditions, so it is important to manually focus your camera to ensure that your stars are sharp.
Recommended Cameras for Astrophotography
While any camera can technically be used for astrophotography, there are several models that are particularly well-suited for this type of photography. These include:
- Canon EOS Rebel T8i
- Nikon D780
- Sony Alpha a7 III
- Fujifilm X-T4
These cameras offer excellent performance in low light conditions and are popular among astrophotographers. However, it is important to note that the best camera for astrophotography is the one that you have with you, so don’t be afraid to experiment with the equipment you already have.
Finding the Perfect Location for Astrophotography
When it comes to astrophotography, finding the perfect location is crucial to capturing stunning images of the night sky. Here are some tips to help you find the ideal spot for your astrophotography endeavors:
Choosing a Dark Location
One of the most important factors to consider when choosing a location for astrophotography is darkness. Light pollution from nearby cities or streets can make it difficult to capture clear images of the night sky. To find a dark location, consider visiting rural areas or wilderness areas that are far away from any sources of light pollution. You can also use online tools such as Stellarium to help you find dark locations.
Finding a Location with a Clear View of the Sky
In addition to darkness, it’s important to find a location with a clear view of the sky. Consider the time of year, as well as the weather forecast, to ensure that the sky will be clear during your astrophotography session. Look for locations with a wide-open view of the sky, such as mountaintops or open fields.
Tips for Scouting the Perfect Location
Before embarking on your astrophotography adventure, take some time to scout out potential locations. Use maps and satellite imagery to get a sense of the terrain and surrounding area. Consider the time of day and the time of year when you plan to visit the location, as well as any potential obstacles such as trees or buildings. It’s also a good idea to visit the location during the day to get a sense of the lighting and terrain.
By following these tips, you can find the perfect location for your astrophotography endeavors and capture stunning images of the night sky.
Planning Your Astrophotography Shoot
When it comes to astrophotography, planning is key to capturing the perfect shot. Here are some important factors to consider when planning your astrophotography shoot:
- Choosing the Right Time for Astrophotography
- The best time for astrophotography depends on a variety of factors, including the location of the celestial object you want to photograph, the time of year, and the time of day. For example, the Milky Way is best photographed during the summer months in the northern hemisphere, while the Orion Nebula is best photographed in the winter.
- It’s also important to consider the phase of the moon. A new moon provides the darkest sky, making it easier to capture faint objects like nebulas and star clusters. A full moon, on the other hand, can provide a dramatic backdrop for landscape photography.
- Understanding the Phases of the Moon
- The moon goes through four main phases: new moon, waxing crescent, first quarter, waxing gibbous, full moon, waning gibbous, third quarter, and waning crescent. Each phase provides a unique opportunity for astrophotography, depending on the type of shot you’re going for.
- Planning for Weather Conditions
- Weather conditions can have a big impact on your astrophotography shoot. Clear skies are ideal for capturing sharp, detailed images of the night sky. However, clouds can add drama and interest to your photos, especially during a full moon. It’s important to check the weather forecast before you head out to plan your shoot.
By considering these factors when planning your astrophotography shoot, you’ll be well on your way to capturing stunning images of the night sky.
Capturing the Night Sky
Setting Up Your Equipment for Astrophotography
Choosing the Right Tripod
One of the most important pieces of equipment for astrophotography is a tripod. It provides stability and allows for longer exposures without camera shake. When choosing a tripod, consider the following factors:
- Height: The tripod should be tall enough to allow you to comfortably reach the camera controls.
- Weight capacity: Make sure the tripod can support the weight of your camera and lens combination.
- Folded size: Consider how easy it is to transport and store the tripod when it is folded.
- Leg design: Some tripods have four legs, while others have three or five. Three-legged tripods are often more stable, but five-legged tripods can provide better weight distribution.
Attaching a Remote Shutter Release
A remote shutter release allows you to trigger the camera’s shutter without touching it, reducing the risk of camera shake during long exposures. There are several options for attaching a remote shutter release to your camera, including:
- Wired remote release: This type of remote release uses a cable to connect to the camera’s remote port.
- Wireless remote release: This type of remote release uses radio frequency or infrared signals to communicate with the camera.
- Smartphone app: Some camera manufacturers offer smartphone apps that allow you to control the camera’s shutter remotely using your phone.
Using a Star Tracker or Polar Aligner
A star tracker or polar aligner is used to align the camera’s orientation with the celestial sphere. This is important for capturing accurate astrophotography images. A star tracker works by finding a star in the camera’s viewfinder and tracking its movement across the sky. A polar aligner works by aligning the camera’s polar axis with the Earth’s axis. Both types of devices can be purchased or homemade.
It is important to note that practice and experience are crucial in mastering the use of these equipment and achieving desired results.
Techniques for Capturing the Night Sky
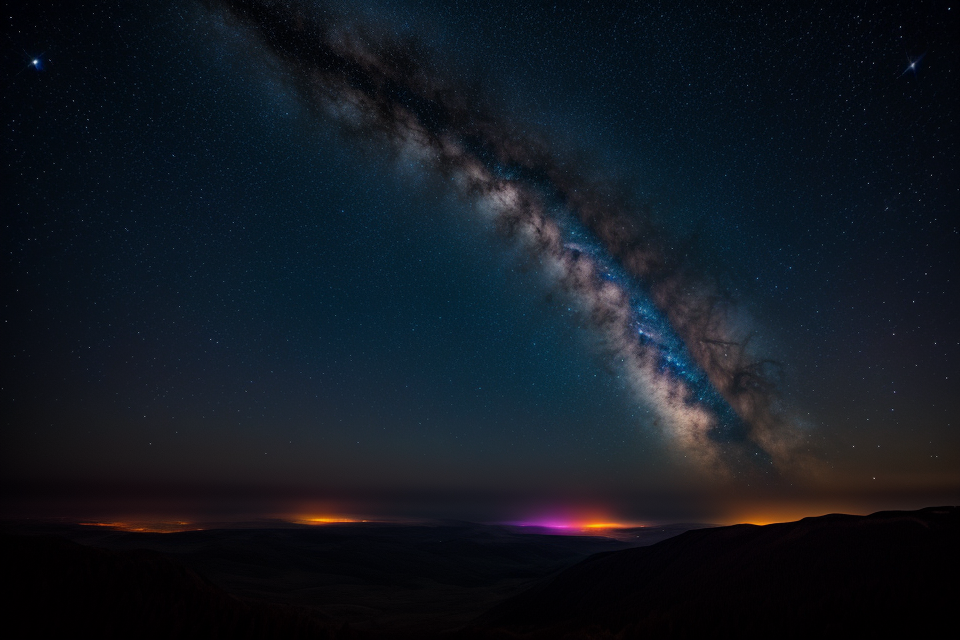
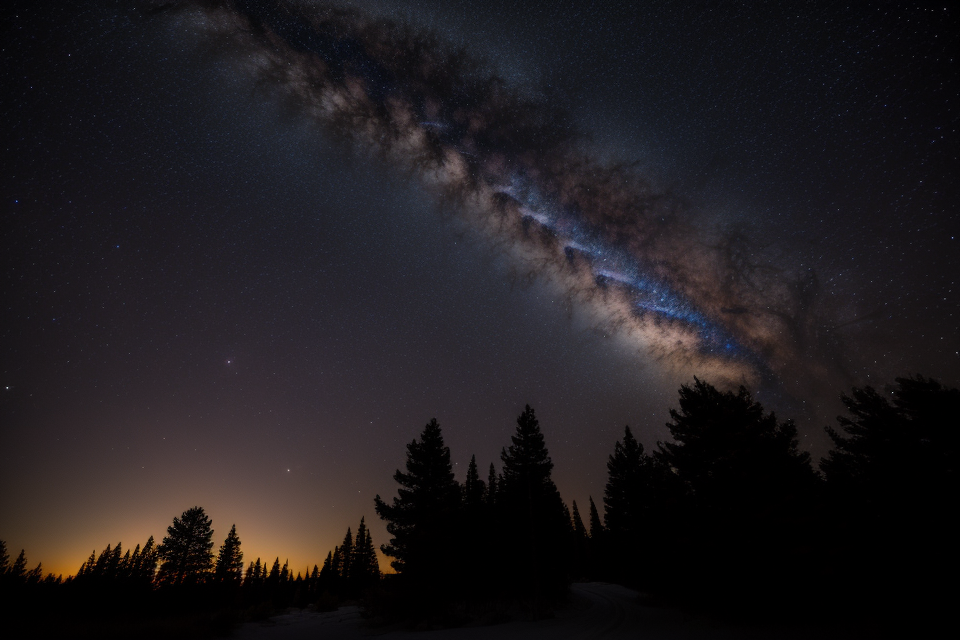
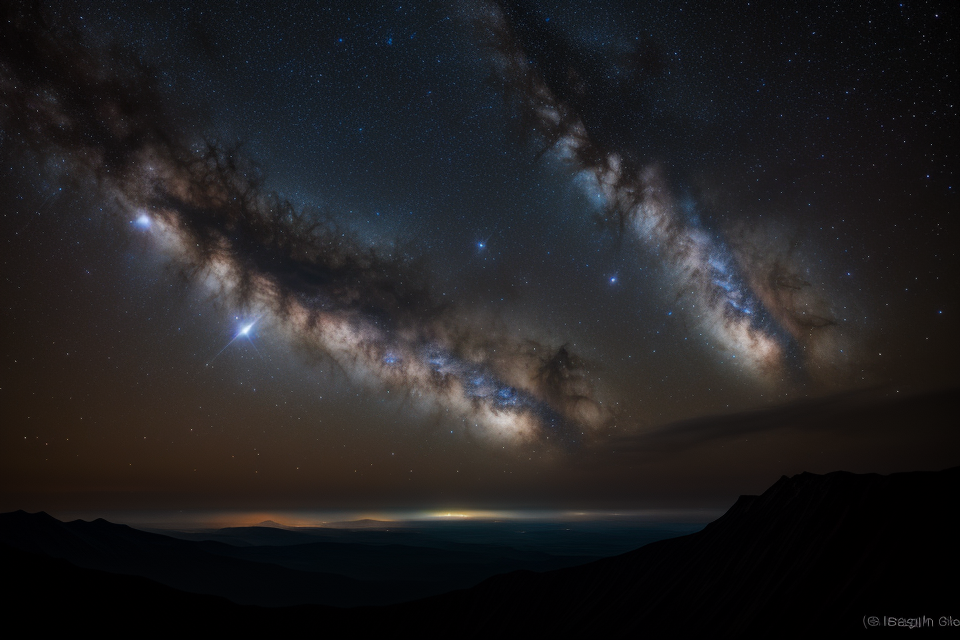
Milky Way Photography
Milky Way photography is a technique used to capture the majestic beauty of our own galaxy, the Milky Way. This technique involves capturing an image of the Milky Way at night, with the galaxy appearing as a bright, white band stretching across the sky.
To capture the Milky Way, photographers must find a location with a clear view of the night sky, away from any light pollution. The best time to capture the Milky Way is during the summer months, when the galaxy is most visible in the night sky.
There are several key elements to consider when capturing the Milky Way, including the camera settings, the lens used, and the composition of the image. A wide-angle lens is recommended for capturing the Milky Way, as it allows for a wider field of view and can capture more of the galaxy in a single shot. Additionally, a low ISO setting and a long exposure time are recommended to capture the details of the Milky Way.
Time-Lapse Photography
Time-lapse photography is a technique used to capture a series of images over a period of time, which are then combined into a video. This technique is often used to capture the movement of the stars and the changes in the night sky over time.
To capture time-lapse photography, photographers must first choose a location with a clear view of the night sky and set up their camera on a tripod. The camera settings should be adjusted to capture a series of images with a low ISO and a long exposure time.
Once the camera is set up, the photographer can use software to combine the images into a video, showing the movement of the stars and the changes in the night sky over time. This technique can be used to capture the beauty of the night sky, as well as to capture the movement of celestial objects such as planets and comets.
Star Trails Photography
Star trails photography is a technique used to capture the movement of the stars in the night sky over a period of time. This technique involves taking a series of images of the night sky, with the camera pointed in the same direction, and then combining the images into a single image.
To capture star trails, photographers must first choose a location with a clear view of the night sky and set up their camera on a tripod. The camera settings should be adjusted to capture a series of images with a low ISO and a long exposure time.
Once the camera is set up, the photographer can use software to combine the images into a single image, showing the movement of the stars in the night sky over time. This technique can be used to capture the beauty of the night sky, as well as to capture the movement of celestial objects such as planets and comets.
In conclusion, there are several techniques for capturing the night sky, including Milky Way photography, time-lapse photography, and star trails photography. Each technique offers a unique perspective on the beauty of the night sky, and can be used to capture the movement of celestial objects and the changes in the night sky over time. With the right equipment and a little bit of knowledge, anyone can capture stunning images of the night sky and the beauty of astrophotography.
Editing Your Astrophotography Images
Editing your astrophotography images is an essential step in creating stunning images of the night sky. In this section, we will explore some basic editing techniques for astrophotography, as well as ways to enhance the details in your images and create stunning astrophotography composites.
Basic Editing Techniques for Astrophotography
The first step in editing your astrophotography images is to adjust the basic settings, such as the exposure, contrast, and brightness. This will help to bring out the details in your images and make them look more natural. You can also adjust the white balance to ensure that the colors in your images look accurate.
Next, you can use techniques such as curve adjustments and levels adjustments to enhance the contrast and brightness of your images. This will help to bring out the details in the darker areas of your images, such as the stars and nebulae.
Finally, you can use techniques such as cropping and straightening to improve the composition of your images. This will help to ensure that your images are visually appealing and that the subjects of your images are well-positioned.
Enhancing the Details in Your Images
One of the main challenges of astrophotography is capturing the details in the night sky. However, with the right editing techniques, you can enhance the details in your images and create stunning images of the night sky.
One technique that can be particularly effective is using noise reduction tools to remove the noise from your images. This will help to improve the clarity of your images and make them look more natural.
Another technique that can be effective is using sharpening tools to enhance the details in your images. This will help to bring out the details in the stars and other celestial objects, and make your images look more crisp and sharp.
Creating Stunning Astrophotography Composites
Finally, one of the most powerful techniques for creating stunning astrophotography images is through compositing. This involves combining multiple images to create a single, stunning image.
One technique that can be particularly effective is combining images of the same object taken at different times of the year. This will help to create a more detailed and accurate image of the object, and allow you to capture details that would otherwise be missed.
Another technique that can be effective is combining images of different objects in the same frame. This can create stunning images that showcase the beauty and diversity of the night sky.
Overall, editing your astrophotography images is an essential step in creating stunning images of the night sky. By using the right techniques, you can enhance the details in your images and create stunning astrophotography composites that showcase the beauty and wonder of the universe.
Advanced Astrophotography Techniques
Photographing Deep Sky Objects
When it comes to astrophotography, deep sky objects are some of the most challenging and rewarding targets to photograph. These objects include galaxies, nebulae, and star clusters, which are all located at great distances from Earth and require specialized equipment and techniques to capture.
Choosing the Right Equipment for Deep Sky Photography
To photograph deep sky objects, you will need a camera that is capable of capturing long exposures and has good low-light performance. A DSLR or mirrorless camera with interchangeable lenses is a good choice, as it allows you to select a lens that is optimized for astrophotography.
Telescopes are also essential for deep sky photography, as they allow you to magnify the objects and capture more detail. A reflecting telescope is generally considered the best choice for astrophotography, as it produces sharper images than a refracting telescope.
Finding the Right Targets for Deep Sky Photography
Once you have your equipment, the next step is to choose the right targets for your astrophotography session. There are many resources available online that can help you identify the best objects to photograph based on your location, time of year, and weather conditions.
Some popular targets for deep sky photography include the Andromeda Galaxy, the Orion Nebula, and the Pleiades star cluster. These objects can be found in the constellations of the same name, and are easily recognizable in the night sky.
Techniques for Capturing Deep Sky Objects
To capture deep sky objects, you will need to use long exposures and a tripod to keep your camera still during the exposure. A remote shutter release is also helpful to avoid any vibrations that might be caused by pressing the shutter button.
It is also important to use a high ISO setting to capture as much light as possible, and to use a narrow aperture to ensure that the object is in focus. A tracking mount can also be useful for capturing long exposures, as it allows the camera to follow the movement of the stars and prevent blurring.
In addition to these techniques, there are also specialized filters and software that can be used to enhance the colors and detail of deep sky objects. These techniques can be complex and require a lot of experimentation, but with the right equipment and techniques, it is possible to capture stunning images of the night sky.
Panoramic Astrophotography
Panoramic astrophotography is a technique used to capture a wide-angle view of the night sky. This technique is perfect for those who want to capture the beauty of the Milky Way or the starry night sky in all its glory.
Understanding Panoramic Astrophotography
Panoramic astrophotography involves taking multiple images of the night sky and stitching them together to create a single, seamless image. This technique allows photographers to capture a much wider field of view than traditional astrophotography techniques.
Techniques for Creating Stunning Panoramic Images
To create stunning panoramic astrophotography images, photographers need to follow a few key techniques. These include:
- Choosing the right equipment: Panoramic astrophotography requires a camera with good low-light capabilities and a wide-angle lens.
- Finding the right location: The best location for panoramic astrophotography is a place with a clear view of the night sky, away from any light pollution.
- Taking multiple images: To create a seamless image, photographers need to take multiple images of the night sky and stitch them together using software.
- Using a tripod: A tripod is essential for keeping the camera steady during long exposures.
- Planning the shot: Photographers need to plan their shot carefully, including the composition and framing of the image.
Software for Creating Panoramic Astrophotography Images
There are several software options available for creating panoramic astrophotography images. These include:
- Adobe Photoshop: Photoshop is a powerful image editing software that can be used to stitch together multiple images and create a seamless panoramic image.
- Aurora HDR: Aurora HDR is a software designed specifically for creating panoramic images. It offers a range of tools for stitching together multiple images and creating a seamless panoramic image.
- PTGui: PTGui is a free software that can be used to create panoramic images. It offers a range of tools for stitching together multiple images and creating a seamless panoramic image.
By following these techniques and using the right software, photographers can create stunning panoramic astrophotography images that capture the beauty of the night sky.
Astrophotography with a Smartphone
- Tips for Capturing the Night Sky with a Smartphone
- Use a tripod to keep the phone steady and avoid blurry images.
- Use a low ISO setting to minimize noise in the image.
- Enable the grid lines on the camera app to help align the shot.
- Take multiple shots and merge them using a software to create a high dynamic range image.
- Editing Astrophotography Images with Smartphone Apps
- Adjust the exposure, contrast, and saturation to enhance the colors in the image.
- Use a curves adjustment layer to bring out the details in the dark and bright areas of the image.
- Add a star trails effect to create a unique and creative image.
- Apply a polarizer filter to reduce reflections and glare from celestial objects.
- Using Smartphone Astrophotography for Time-Lapse Videos
- Set up the camera on a tripod and use a time-lapse app to capture images over a period of time.
- Use a low ISO setting and manual focus to ensure sharp and stable images.
- Use a intervalometer app to set the interval between frames and control the duration of the time-lapse.
- Edit the time-lapse video using a video editing app to create a stunning and breathtaking video of the night sky.
Astrophotography with a Webcam
Webcam astrophotography is a cost-effective and accessible way to capture the night sky. Here’s what you need to know to get started:
Understanding Webcam Astrophotography
Webcam astrophotography involves using a camera to capture images of the night sky. This technique is popular because it is relatively inexpensive and easy to set up. With a webcam, you can capture stunning images of the stars, planets, and other celestial objects.
Choosing the Right Webcam for Astrophotography
To get the best results, you need to choose the right webcam for astrophotography. Look for a camera with a fast frame rate, low noise, and high sensitivity. A webcam with a CCD sensor is recommended as they tend to have better sensitivity than CMOS sensors. Additionally, consider a webcam with manual controls for exposure, focus, and white balance.
Techniques for Capturing the Night Sky with a Webcam
Once you have the right equipment, it’s time to start capturing the night sky. Here are some techniques to help you get the best results:
- Use a Tripod: Use a sturdy tripod to keep your camera steady during long exposures. This will help you capture sharp and detailed images of the night sky.
- Use a Remote Shutter Release: Use a remote shutter release to avoid camera shake when taking long exposures.
- Set the White Balance: Set the white balance to “cloudy” or “tungsten” to capture accurate colors in your images.
- Experiment with Exposure: Experiment with exposure times to get the best results. Longer exposures will capture more light and produce brighter images, but be careful not to overexpose your images.
- Capture Moving Objects: Capture moving objects like satellites and meteors by using a higher frame rate and a shorter exposure time.
- Stack Images: Stack multiple images to create a composite image that shows more detail and reduces noise.
By following these techniques, you can capture stunning images of the night sky with a webcam.
Astrophotography with a DSLR or Mirrorless Camera
When it comes to astrophotography, DSLR (Digital Single-Lens Reflex) and mirrorless cameras are popular choices among photographers. These cameras offer greater flexibility and control over the image-making process, making them ideal for capturing the night sky. In this section, we will discuss the basics of using DSLR or mirrorless cameras for astrophotography.
Understanding DSLR and Mirrorless Cameras for Astrophotography
DSLR and mirrorless cameras both have their advantages and disadvantages when it comes to astrophotography. DSLR cameras are known for their excellent low-light performance and high dynamic range, making them well-suited for capturing the night sky. Mirrorless cameras, on the other hand, are often lighter and more compact, making them easier to transport and set up in remote locations.
Choosing the Right Lens for Astrophotography
The right lens is crucial for capturing stunning astrophotography images. Wide-angle lenses, such as those with a focal length of 14mm or less, are popular choices for astrophotography because they allow photographers to capture a wide field of view, including the Milky Way and other celestial objects. Telephoto lenses, on the other hand, are ideal for capturing detailed images of specific celestial objects, such as planets and galaxies.
Techniques for Capturing the Night Sky with a DSLR or Mirrorless Camera
When it comes to capturing the night sky with a DSLR or mirrorless camera, there are several techniques that can help you achieve stunning results. First, it’s important to use a tripod to keep your camera stable during long exposures. Next, use a remote shutter release or the camera’s self-timer to avoid any camera shake during the exposure. Additionally, use a low ISO setting to reduce noise and increase image quality. Finally, use manual focus to ensure that your images are sharp and in focus.
In conclusion, using a DSLR or mirrorless camera for astrophotography can result in stunning images of the night sky. By understanding the basics of these cameras, choosing the right lens, and using proper techniques, you can capture breathtaking images of celestial objects that will inspire and awe.
FAQs
1. What is astrophotography?
Astrophotography is the art and science of capturing images of celestial objects, such as stars, planets, nebulas, and galaxies, through photography. It requires specialized equipment and techniques to capture the faint light of these objects and produce high-quality images.
2. What equipment is needed for astrophotography?
The equipment needed for astrophotography depends on the type of photography you want to do. For beginners, a simple DSLR or mirrorless camera, a tripod, and a remote shutter release are essential. For more advanced astrophotography, such as deep-sky imaging, a dedicated astronomy camera, a mount for tracking the stars, and a cooled CCD or CMOS sensor are necessary.
3. When is the best time for astrophotography?
The best time for astrophotography is during the winter months when the skies are darker and the stars are clearer. The moon also plays a role in astrophotography, as it can provide interesting features and lighting effects in the sky. It is important to check the phase of the moon and the weather conditions before planning an astrophotography session.
4. How do I choose a location for astrophotography?
Choosing a location for astrophotography depends on the type of photography you want to do and the weather conditions. Ideally, you want to find a location with a clear view of the horizon and minimal light pollution. Mountains, deserts, and beaches are often good locations for astrophotography, but any location with a clear view of the sky can work.
5. How do I capture images of the moon?
Capturing images of the moon requires a telephoto lens and a tripod. You can also use a remote shutter release to avoid camera shake. The best time to photograph the moon is during the full moon, as it provides more light and detail in the image. It is also helpful to scout out the location ahead of time to find a clear view of the moon and the surrounding landscape.
6. How do I capture images of stars and constellations?
Capturing images of stars and constellations requires a wide-angle lens and a tripod. You can also use a remote shutter release to avoid camera shake. It is important to use a low ISO and a long exposure time to capture the faint light of the stars. You can also use a star tracker or a polar alignment tool to help you capture sharp and well-aligned images of the stars.
7. How do I process astrophotography images?
Processing astrophotography images requires specialized software, such as Adobe Photoshop or Lightroom. It is important to adjust the exposure, contrast, and color balance of the image to bring out the details and colors of the celestial objects. You can also use noise reduction techniques to reduce the grain in the image. There are also specific astrophotography processing software available that can help you achieve better results.
8. Can I use a smartphone for astrophotography?
While it is possible to use a smartphone for astrophotography, it is not recommended for serious astrophotography. Smartphones do not have the necessary equipment or techniques to capture high-quality images of celestial objects. However, you can use a smartphone app to help you identify celestial objects and plan your astrophotography session.