The night sky has always been a source of fascination for humanity. It’s a canvas of endless stars, planets, and galaxies that stretch as far as the eye can see. For many photographers, capturing the beauty of the night sky is a passion that drives them to explore new techniques and technologies. However, photographing the night sky is not as simple as pointing a camera upwards and clicking the shutter. It requires careful planning, specialized equipment, and a deep understanding of the technical aspects of photography. In this guide, we will explore the tips and tricks of night sky photography, from selecting the right equipment to editing your photos for stunning results. Whether you’re a seasoned photographer or just starting out, this guide will help you capture the mystery and beauty of the night sky like never before.
The Magic of Night Sky Photography
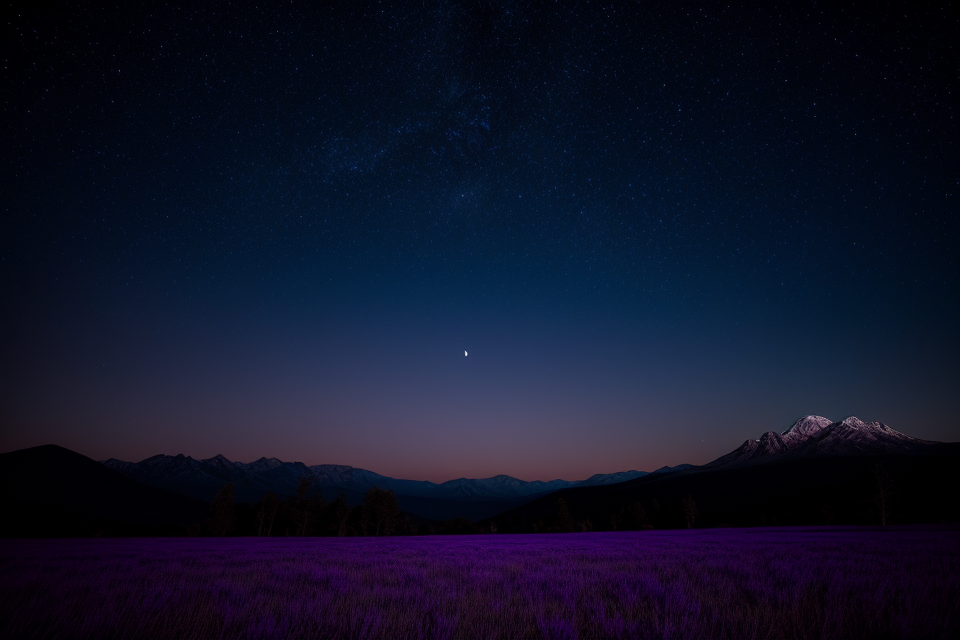
Discovering the Beauty of the Night Sky
- The awe-inspiring celestial spectacle
- The night sky offers a breathtaking display of celestial wonders that have captivated the imagination of humankind for millennia. From the twinkling of stars to the sweeping arc of the Milky Way, the night sky is a canvas of infinite beauty that inspires a sense of wonder and awe.
- Intriguing phenomena: stars, constellations, and the Milky Way
- Stars, those shining balls of gas, are the building blocks of the night sky. They come in a myriad of colors, sizes, and brightness, each with its own unique story to tell. Constellations, those celestial patterns, are a way to navigate the night sky and to discover the stories of ancient civilizations. The Milky Way, our home galaxy, is a stunning spectacle that appears as a bright, glowing band arching across the night sky.
- Seasons and location: maximizing your photographic opportunities
- The night sky is not static; it changes with the seasons and the location. Each season brings its own unique set of celestial events and photographic opportunities. From the vibrant colors of the northern lights in the winter to the stunning display of meteors during the Perseid shower in the summer, the night sky is a never-ending source of inspiration for photographers. And the location plays a crucial role in capturing the best images. From the high deserts to the mountains, from the coast to the city, each location offers its own unique perspective on the night sky. By understanding the best times and places to shoot, photographers can maximize their chances of capturing the perfect image.
Essential Equipment for Night Sky Photography
Night sky photography is an exciting and rewarding hobby that allows you to capture the beauty of the cosmos. To get started, you’ll need to invest in some essential equipment that will help you take stunning photos of the night sky. In this section, we’ll explore the cameras and lenses suitable for astrophotography, tripods and remote shutter releases, and other accessories that will enhance your night sky photography experience.
Cameras and lenses suitable for astrophotography
The camera you choose will play a significant role in the quality of your night sky photos. For astrophotography, you’ll want a camera with a full-frame sensor, as it will allow you to capture more light and produce clearer images. DSLR cameras are popular choices for astrophotography because they offer manual controls, which give you more flexibility when adjusting settings like ISO, shutter speed, and aperture.
When it comes to lenses, you’ll want a wide-angle lens to capture as much of the night sky as possible. A lens with a focal length of 14mm or wider is ideal for astrophotography. You’ll also want a lens with a low aperture, such as f/2.8 or lower, to allow more light into the camera and reduce the risk of overexposure.
Tripods and remote shutter releases
Tripods are essential for night sky photography because they allow you to keep your camera still during long exposures. A sturdy tripod will help you capture sharp images of the stars and prevent blur from camera shake. It’s also a good idea to invest in a remote shutter release, as it will allow you to trigger the camera’s shutter without touching it, reducing the risk of camera shake and creating even sharper images.
Accessories: star trackers, cable releases, and camera straps
Other accessories that can enhance your night sky photography experience include star trackers, cable releases, and camera straps. Star trackers are devices that attach to your camera and help you track the movement of the stars as they appear to move across the night sky. Cable releases allow you to trigger the camera’s shutter remotely, reducing the risk of camera shake during long exposures. Camera straps are also useful for keeping your camera secure while you’re taking photos of the night sky.
Planning Your Night Sky Photography Adventure
Choosing Your Location
Selecting dark sky sites for optimal stargazing
When choosing a location for your night sky photography adventure, it’s essential to select a site that offers a clear and unobstructed view of the night sky. Dark sky sites are the best option for capturing stunning images of the stars and other celestial bodies. These locations are usually far away from any sources of light pollution, such as cities or towns, and offer a clear view of the Milky Way and other galaxies.
To find a dark sky site, you can use online resources such as the Dark Sky Association’s map of International Dark Sky Places. This map provides information on the best locations for stargazing and night sky photography, as well as details on the darkness of the sky at different times of the year.
Planning your itinerary: moon phases, weather, and time of year
Another important factor to consider when choosing a location for your night sky photography adventure is the timing of your trip. The moon phase, weather conditions, and time of year can all affect the quality of your images.
For example, a full moon can provide a beautiful and dramatic backdrop for your images, but it can also wash out the stars and make it difficult to capture detailed shots of the constellations. On the other hand, a new moon provides the best conditions for stargazing and night sky photography, as the sky is dark and the stars are visible in great detail.
Weather conditions can also play a role in your choice of location. Clear and calm weather is ideal for capturing sharp and detailed images of the night sky, while wind, rain, or other weather conditions can make it difficult to capture the images you want.
Finally, the time of year can also affect the quality of your night sky photography. The winter months, for example, offer a clear view of the Milky Way, while the summer months provide a stunning view of the Perseid meteor shower.
Respecting local regulations and etiquette
When choosing a location for your night sky photography adventure, it’s important to respect local regulations and etiquette. Some locations may require permits or fees for access, while others may have restrictions on the use of equipment or the timing of your visit.
In addition, it’s important to be respectful of other visitors and residents in the area. This means being mindful of noise levels, leaving the area clean and free of debris, and respecting any designated areas or boundaries.
By considering these factors when choosing a location for your night sky photography adventure, you can ensure that you capture the best possible images of the night sky.
Capturing the Perfect Shot
Proper exposure settings for night sky photography
Exposure settings play a crucial role in capturing the perfect shot of the night sky. The first step is to determine the correct shutter speed, aperture, and ISO values for the desired effect. Typically, a longer exposure time is needed to capture the stars and other celestial objects, which requires setting a lower ISO value to minimize noise and using a narrower aperture to maintain sharpness.
Focusing techniques for celestial objects
Achieving a sharp focus on celestial objects can be challenging due to the darkness and the movement of the stars. To ensure proper focus, it is essential to use a technique called “focus stacking.” This method involves taking multiple shots at different focus points and then combining them using software to create a single image with optimal sharpness.
Capturing light trails and time-lapse sequences
Capturing light trails and time-lapse sequences of celestial objects requires careful planning and timing. Light trails can be created by photographing moving objects, such as cars or airplanes, during long exposures. Time-lapse sequences involve taking multiple shots over a period of time and then combining them to create a video that showcases the movement of the stars and other celestial objects. To achieve this, a sturdy tripod and a remote shutter release are necessary to avoid camera shake and ensure sharp images.
Post-Processing Your Night Sky Images
Enhancing Your Astrophotography
Basic photo editing: adjusting exposure, contrast, and color balance
After capturing your astrophotography images, the first step in enhancing them is basic photo editing. This involves adjusting the exposure, contrast, and color balance of your images to bring out the best in your night sky shots.
Exposure adjustments are critical in astrophotography as they determine how much light is captured by the camera’s sensor. Underexposed images will appear too dark, while overexposed images will lose detail in the brightest areas of the image. Adjusting the exposure to ensure that the image is correctly exposed will help to bring out the details in the night sky.
Contrast adjustments can also be made to enhance the image’s overall appearance. Contrast adjustments help to bring out the details in the shadows and highlights of the image. However, it is essential to be careful when adjusting contrast as too much contrast can wash out the image and make it appear overprocessed.
Color balance adjustments are also critical in astrophotography. The color balance of an image can affect how realistic the night sky appears. Adjusting the color balance to ensure that the night sky appears natural and true to life is essential.
Stacking and noise reduction techniques
Another technique used in enhancing astrophotography images is stacking. Stacking involves combining multiple images of the same scene taken at different exposures to create a single image with improved dynamic range and reduced noise. This technique is particularly useful when shooting deep-sky objects such as nebulae and galaxies.
Noise reduction techniques are also used to enhance astrophotography images. Noise is an unwanted artifact that appears in images captured in low-light conditions. Noise reduction techniques such as using long exposures, reducing the ISO setting, and using image processing software to remove noise can help to improve the overall quality of the image.
Bringing out the details: image enhancement and sharpening
After adjusting the exposure, contrast, and color balance, and using stacking and noise reduction techniques, the final step in enhancing your astrophotography images is to bring out the details. This can be achieved through image enhancement and sharpening techniques.
Image enhancement techniques involve improving the overall appearance of the image by adjusting the brightness, contrast, and saturation. Sharpening techniques, on the other hand, involve improving the clarity and definition of the image by enhancing the edges and details.
Sharpening techniques can be applied using image processing software such as Adobe Photoshop. There are various sharpening techniques available, including contrast-based sharpening, edge-detection sharpening, and high-pass sharpening. Each technique has its advantages and disadvantages, and it is essential to choose the right technique for your image.
In conclusion, enhancing your astrophotography images involves basic photo editing, stacking and noise reduction techniques, and image enhancement and sharpening techniques. By following these steps, you can bring out the details in your night sky shots and create stunning astrophotography images.
Sharing Your Celestial Creations
Once you have processed your night sky images, the next step is to share your work with the world. There are various online platforms where you can showcase your astrophotography, and some of the most popular ones include:
By sharing your images on these platforms, you can connect with other astrophotographers, receive feedback, and gain inspiration for your future projects.
Another way to showcase your work is by creating a portfolio website or blog. This allows you to curate your best images and provide context and background information about your astrophotography journey. You can use website builders like WordPress or Squarespace to create a professional-looking website without any coding knowledge.
Engaging with the astrophotography community is also crucial for growth and learning. You can join online forums, attend workshops, and participate in competitions to expand your knowledge and network with other enthusiasts. Some popular astrophotography forums include Cloudy Nights and AstroBin. Attending workshops and competitions can provide you with valuable feedback and exposure to new techniques and equipment.
By sharing your celestial creations, you can contribute to the global community of astrophotographers and inspire others to explore the wonders of the night sky.
Safety and Responsibility in Night Sky Photography
Ensuring Your Safety
Capturing the beauty of the night sky can be a thrilling experience, but it’s important to prioritize safety when venturing out into the great outdoors. Here are some precautions to take when shooting in the dark:
- Precautions when shooting in the dark: It’s essential to be aware of your surroundings and take necessary precautions when shooting at night. This includes being mindful of wildlife, staying on designated trails, and avoiding areas with steep drop-offs or other hazards. It’s also important to dress appropriately for the weather and bring flashlights or headlamps to help navigate.
- Navigating unfamiliar terrain: If you’re in an unfamiliar location, it’s important to have a map or GPS device to help you navigate. Additionally, it’s a good idea to let someone know where you’re going and when you plan to return.
- Respecting nature and the environment: When photographing the night sky, it’s important to respect the environment and leave no trace. This means packing out all trash, staying on designated trails, and avoiding disturbing wildlife or natural habitats. Additionally, it’s important to be mindful of local regulations and restrictions when shooting in parks or other protected areas.
By taking these precautions, you can ensure a safe and enjoyable night sky photography experience while minimizing your impact on the environment.
Promoting Responsible Astrophotography
- Minimizing environmental impact
- Sharing knowledge and resources
- Respecting the beauty and wonder of the night sky for future generations
Promoting responsible astrophotography is essential to ensure the continued enjoyment and preservation of the night sky for generations to come. Here are some ways in which astrophotographers can promote responsible practices:
Minimizing Environmental Impact
Astrophotographers should take steps to minimize their impact on the environment when engaging in night sky photography. This includes:
- Avoiding leaving behind trash or other debris in natural areas
- Respecting the boundaries of protected areas and refraining from trespassing
- Using environmentally friendly equipment and supplies whenever possible
- Adhering to Leave No Trace principles
Sharing Knowledge and Resources
Astrophotographers can also promote responsible astrophotography by sharing their knowledge and resources with others. This can include:
- Offering advice and guidance to beginners interested in night sky photography
- Sharing information about best practices for minimizing environmental impact and respecting the night sky
- Donating equipment or funds to support astronomy education and outreach programs
- Collaborating with other photographers and organizations to promote responsible astrophotography
Respecting the Beauty and Wonder of the Night Sky
Finally, astrophotographers should respect the beauty and wonder of the night sky and strive to promote its preservation for future generations. This includes:
- Refraining from engaging in activities that could damage the night sky, such as excessive light pollution or disruptive behavior in natural areas
- Encouraging others to appreciate and protect the night sky
- Advocating for policies and practices that promote dark sky preservation and responsible astrophotography
- Inspiring others to explore the mysteries of the night sky through their own photography and appreciation.
FAQs
1. Can you photograph the night sky?
Yes, it is possible to photograph the night sky, but it requires careful planning, equipment, and techniques. The key to successful night sky photography is to capture the Milky Way, stars, and other celestial objects while minimizing the impact of light pollution and long exposure noise.
2. What equipment do I need for night sky photography?
You will need a camera with manual controls, a sturdy tripod, and a remote shutter release or intervalometer. A wide-angle lens is also recommended to capture the vastness of the night sky. Additionally, you may need filters, such as a star tracker or polarizing filter, to enhance the color and contrast of your images.
3. When is the best time to photograph the night sky?
The best time to photograph the night sky depends on your location and the time of year. In general, the summer months offer the longest periods of darkness, making them ideal for night sky photography. The New Moon is also the best time to photograph the Milky Way, as the Moon’s light will not overpower the stars.
4. How do I choose my location for night sky photography?
Choose a location with minimal light pollution and an open horizon to capture the stars and the Milky Way. Look for high, open spaces such as mountains, deserts, or beaches. You can also use tools like the Light Pollution Map to find the best locations for your night sky photography.
5. How do I take photos of the night sky?
To capture the night sky, you will need to use a low ISO, a wide aperture, and a long exposure. You may also need to use a technique called “light painting” to add additional light to your scene to highlight foreground elements. Be sure to use a remote shutter release or intervalometer to avoid camera shake during the long exposure.
6. How do I process my night sky photos?
Processing your night sky photos involves adjusting the exposure, contrast, and color balance to bring out the details and colors of the stars and the Milky Way. You may also want to use techniques like stacking and noise reduction to improve the quality of your images. There are many software options available, including Adobe Lightroom and Photoshop, to help you process your night sky photos.


